Wednesday, February 8, 2017

Samoa Truffles

I've been told it's that time of the year.  When those little darling girls come out in droves to sell those boxes of cookies.  Rumor has it those things are as addictive as say...CHIROPRACTIC.  I myself have never tried any of the wide variety GIRL SCOUT cookies.  I am sure when I was less informed, before I knew if you can't pronounce an ingredient you probably shouldn't eat it, I may have tried a Girl Scout cookie.  However, being from Canada, we had GIRL GUIDES- a less flashy version of the US Girl Scout. Our cookies were equally simple.   Girl Guide cookies came in 3 flavors: chocolate, vanilla and peanut butter.  Yep that was it.  You could imagine how hard it was to sell those things.

So when I came up with this no processed anything truffle made with a caramel, coconut filling, dipped in chocolate my husband tried one bite and said "these taste like a Samoa ONLY BETTER!"  
After a quick lesson in Girl Scout cookies, I decided my Truffle creation arrived just in time.  I mean have you looked at the ingredients in some of those cookies?!    The "lighter" version of the Samoa has 6 different types of sugars! 

The Samoa Truffle so good, I may have a bunch of pint-sized Girl Scouts with picket signs, protesting outside my house.  It's worth the risk. I hope you enjoy...


Samoa Truffle
 Ingredients
1 cup Medjools dates
1/2 cup water
1/2 cup coconut milk
1/4 teaspoon sea salt
2 tablespoons coconut oil
2 1/4 cup finely shredded coconut
 

Chocolate
1/4 cup cocoa powder
1/4 coconut oil
2 Tablespoons honey or maple syrup


Place dates, water, sea salt and coconut milk in a blender. Blend at medium speed until ingredients form a paste. Add coconut oil and turn the blender to high and mix until the paste is smooth and resembles caramel. Place all but a 1/4 cup of caramel sauce in a bowl with 2 1/4 cup of finely shredded coconut. Stir until well mixed. Roll coconut mixture into 1-1.5 inch balls and set them on a baking sheet lined with parchment. Place balls into the freezer for 30 minutes or longer. Mix coconut oil, cocoa and honey with an emulsion blender. Remove coconut balls from freezer and coat well with chocolate. Sprinkle with shredded coconut and drizzle with remaining caramel. Place in the fridge to harden.  These will keep for weeks but won't last but a few days.  

Makes about 24 Truffles depending on the size.

Dates, water and coconut milk in the blender with a little sea salt


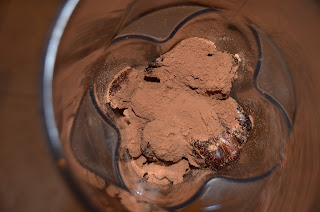
Transforming into that creamy caramel sauce.

Adding some coconut oil

No added sugar, caramel sauce.

 Let me tell you, if you stopped right here and just ate the caramel sauce, I would not hold that against you.  It is THAT good. 
 
Rolling the coconut caramel into balls.


Coconut caramel balls

 If you did not want to make your own chocolate.  Melt your favorite high end chocolate bar in a double boiler.  I like GREEN & BLACK 70% Cocoa bar
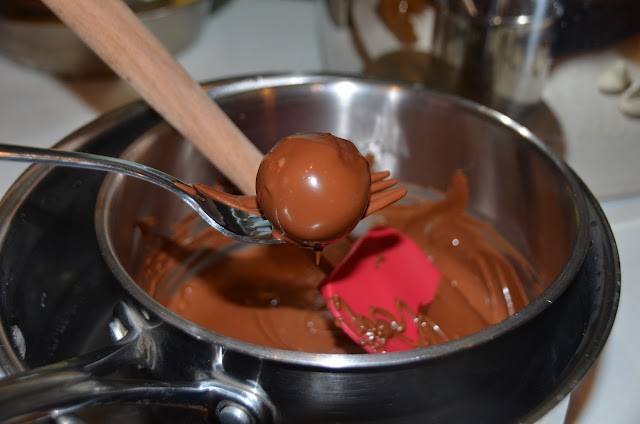
Dipping into chocolate


Tap the fork against the side of pan to remove excess chocolate.


Samoa Truffle


Coconut, Caramel Samoa Truffle.

Thursday, January 12, 2017

Cabbage Roll Soup

Making cabbage rolls can be tedious but the results are well worth the effort.  How about enjoying the rich flavors of cabbage rolls with half the work?  Well if that sounds good to you, then pull up a chair and let's enjoy some Cabbage Roll Soup!


INGREDIENTS 
1 lb. ground beef
1 large yellow onion, diced
5-7 carrots, diced
1/4 cup dried mushrooms, crumbled
2 tablespoons extra virgin olive oil or avocado oil
3 garlic cloves, minced
7 cups chopped green cabbage (about half of a large sized head)
5 cups vegetable stock
1 can (32oz) crushed tomatoes
3/4 cup uncooked brown rice or grain of your choice
2 dried bay leaves
1 tsp. sea salt, or more to taste
1 tablespoon dried oregano leaves
1/2 teaspoon cayenne pepper 
2 teaspoons dried basil
Sour cream for serving 

Add oil to the bottom of a large soup pot with heat to medium.     Add carrots, onions, cabbage and salt.  Cook with lid on until vegetables are softened.  Add small amounts of vegetable stock when vegetables begin sticking to the bottom of the pot and stir.  Once vegetables are softened, add the remaining vegetable stock, dried mushrooms, canned tomatoes, garlic and remaining spices. Meanwhile in a separate pan, cook ground beef until browned and add to soup pot.  Add rice and simmer on medium heat for at least 45min. Once rice is cooked, you can simmer on low until ready to eat.  Serve with a dollop of sour cream.  

Here I used 1/2 pound of organic, grass-fed beef and 1/2 pound ground deer meat.

Cook to brown.

Soften vegetables, adding stock when needed.


Chop cabbage

Add spices.

Add remaining stock.

Add crushed tomatoes

Add browned meat.

I used Freekeh, instead of rice.

A bowl of cabbage roll soup!

The flavors and health benefits are rich.

The Many Benefits of Cabbage
Cabbage is a cruciferous vegetable that is an excellent source of both Vitamin C and Vitamin K. Vitamin K is important for the health of our bones and has been shown to prevent fractures in post-menopausal  women.  In several large studies, cabbage has been shown to be very important in the prevention of diabetes.  It is also an excellent source of Sinigrin, a sulfur-containing compound known to prevent various forms of cancer including bladder, colon and prostate. Cabbage juice has been found to aid in the healing of stomach ulcers.  There are 4 grams of fiber per 1 cup serving, totally only 44 calories. This makes cabbage more fiber dense than beans! Cabbage is also  the second most economical cooked vegetable in terms of price per edible cup, behind the potato.  Given it’s vast health benefits, cabbage is a nutrient bargain. 

Let me know, how you make yours?  What meat or grain combination did you try?  How were your results?


Monday, November 28, 2016

Mini Pumpkin Pies with a Date Nut Crust


There is nothing better than that combination of cinnamon, ginger, cloves, nutmeg and pumpkin this time of year.  OR anytime of year really.  These little pumpkin pies are so good you may question how good they are for you. 
The crust is a unique combination of dates, nuts, cocoa and coconut. NO ADDED SWEETENER OR FLOUR.  The crust is the perfect compliment to the custard-like pumpkin that lies on top. The entire thing is so easy to make and is the perfect ending to any meal. 


Ingredients:
2 Tablespoons cocoa powder
1/2 cup chopped walnuts
1/2 cup unsweetened shredded dried coconut
1/2 cup pitted medjool dates ( about 12)
1 cup pumpkin puree 
1 tsp cinnamon
1/4 tsp ground ginger & cloves
pinch of sea salt
1/8 teaspoon grated nutmeg
2 organic eggs
1/4 cup grade maple syrup

1 tsp vanilla extract
1 cup coconut milk (full fat)                                                           
Directions: Line 16 muffin tins with paper liners and grease with coconut oil or butter.  In a food processor, blend together the cocoa powder, nuts, dried coconut and dates to make the crust.  Drop a  tablespoon of the crust into the paper muffin liners and press down to the bottom.  In a small bowl, mix the ingredients for the pumpkin pie filling with a blender until smooth.  Pour pie filling into paper cups about 2/3rds full.  Bake at 350 degrees for 20-25 minutes or until              filling is set. Remove from oven and allow to cool.  Serve  with a  drizzle of melted chocolate and/or  a dollop of fresh whipped cream. 

Simple, healthy ingredients for the crust.

Add to a food processor or blender

Shredded coconut, walnuts, dates and cocoa powder

Crust blended and ready.

Press into greased paper muffin liners.

Blend pumpkin, spices, eggs, vanilla, maple syrup and coconut milk.


Poor filling into muffin liners until 3/4 full.

Ready to Bake!

A delicious bite that you don't have to feel guilty for.


I have also made these in mini muffin tins as well, which I feel are perfect for big gatherings where there are multiple desserts.  This gives everyone a chance to try a "bite" without overindulging.  The mini muffin size is also just the right portion for little kids.

Friday, October 21, 2016

Spaghetti Squash with Thai Peanut Sauce

If you are looking for something a little different to make for dinner because your routine is getting a little ordinary, I have just the recipe for you. Spaghetti Squash replaces a typical noodle that is found in this Thai dish.  The lightness of the spaghetti squash,  is the perfect combo for this creamy sauce.


1/2 cup creamy natural, unsweetened peanut butter
1 can 13.5 oz coconut milk
2 tablespoons apple cider vinegar
1 tablespoon honey
2 Tablespoons turmeric
2 garlic cloves, minced
1 teaspoon cumin
1 tablespoon grated ginger
¼ teaspoon cayenne pepper
¼ cup fresh chopped green onion
¼ cup fresh chopped cilantro
½ teaspoon sea salt
2 cups spinach  or kale
1 large spaghetti squash
Avocado oil or coconut oil
Sea salt
 
Preheat oven to 350 F. Half the squash and scoop out the seeds. Drizzle inside with oil  and sprinkle with salt. Place spaghetti squash cut side down on a baking sheet and roast for 25 minutes. When spaghetti squash is done roasting, remove it from the oven and let cool for 10 minutes. Then, using a fork, scrape out the spaghetti squash strands.
Over a medium heat, add peanut butter, coconut milk, garlic, spices and salt to a skillet.  Cook until peanut butter is melted and sauce is bubbling.  Add green onions and spinach.  Cook until they are softened.  Place  spaghetti squash into the bubbling sauce.  Remove from heat and stir to combine. Serve with a garnish of fresh chopped cilantro. 

 
Cut and scoop out seeds
 It is important when choosing a spaghetti squash to get one that is bright yellow with no brown spots.  The area around the stem should be firm and free of any black color.  The peel should be shiny and firm and not be easily marked with your fingernail.  An old spaghetti squash will be flavorless and mushy and will not yield strong spaghetti-like strands. 
Cook face down until outer peel is easily pierce with a fork.


Sea salt and avocado oil
 If you desired kale in stead of spinach cook this first in the oil and salt until softened.  If you are using spinach add the fresh spinach in the final steps as to avoid it becoming mushy.  I used yellow cooking onions instead of green onions as my kids prefer yellow onions.  I cooked them with the kale.

 
Someone is always on the prowl for kale. 


Add apple cider vinegar
Then add 1 can of coconut milk.  NO light milk.  Full fat, please.

I'm a bit of a peanut butter connoisseur so I always have several varieties on hand.  My favorite is the Mara Natha's no stir organic PB.  It is slightly sweetened so I did not add any honey.  If your are using PB without any sweetener, a little honey really makes this dish. 

Add the PB and stir until combined.

A pinch of cayenne pepper brings a little heat to the dish. My kids love it.


Grilled chicken or shrimp is a nice addition to this otherwise vegetarian meal.

Monday, September 12, 2016

Coconut Oil Immuno-Melts


It's back to school time! This often means a change in schedule, sleeping and eating habits and more exposure to illness.  Coconut oil Immuno-Melts are the perfect solution to keeping your immune system strong during a time of increased demand.  Coconut oil Immuno-Melts  are easy to make, taste like lemon icing and are good for the entire family!


1 cup coconut oil

3 tablespoons lemon juice

1-2 tablespoon lemon zest or 5-10 drops of lemon oil

2-3 Tablespoons raw honey

1/4 teaspoon fresh grated ginger or garlic


Mix all ingredients in a small blender until well emulsified.  Under mixing may result in inconsistent taste. Pour mixed oil into silicon molds or mini muffin tins lined with parchment.  Place the filled molds in the fridge or freezer.  Once solidified, remove immuno-melts from their molds and store in an air tight   container in the fridge.  Enjoy as desired!


If you are having trouble getting the honey to mix evenly with the other ingredients, check out my troubleshooting tips from my Complete Guide to Coconut Oil Chocolates.

Cooling the coconut oil until it is semi-solid, allows for easy honey emulsification.

Blend all ingredients well with a blender.

Pour into molds.

Place in fridge or freezer to solidify. 


Why IMMUNO-MELTS work....


Lemons are high in Vitamin C, which boosts our immune response. Vitamin C is also a strong antioxidant, which means it helps protect against damage at the cellular level.   Lemons are also antiseptic in nature providing additional support against bacterial infection.  


What's more lemons also improve digestion, which encourages better absorption of other vitamins and minerals essential to a strong immune response.  This fresh smelling citrus fruit also helps eliminate the occurrence of kidney and gallstones.  The citrate in lemons prevents calcium from binding to other constituents that lead to the formation of crystals.  When all digestive organs are functioning well, better detoxification happens, which also decreases your risk of infection. 


Ginger, like lemons is a natural antibiotic and a strong antioxidant.  Ginger also provides anti-inflammatory  benefits and shows much promise to those battling various arthritides.  Ginger improves circulation and promotes better respiration which is beneficial to those battling a sinus or upper respiratory infection. Ginger is best known for preventing or lessening the symptoms of nausea but it has also displayed many anti-cancer properties especially for leukemic, skin, kidney, lung, and pancreatic cancers.


Honey and coconut oil not only make these Immuno-melts taste delicious but they too have many anti-fungal, antibacterial and antiviral properties.  And if you are worried about all the fat calories, worry no more.  Coconut oil is metabolized in the liver which prevents fat storage and increases metabolism.  So you may even loose a few pounds while boosting your immune system.     


If you use garlic in addition to ginger or on it's own it will give these Immuno-melts super-powers.  Yes, garlic is by far one of nature's best disease preventers.  I have added up to 1 finely minced, large clove of garlic per recipe without any noses turning up.  If you are not sure how much garlic you will like, start out with 1/4 teaspoon and go up from there. 


Store in an air-tight container in the fridge.