Wednesday, October 21, 2015

Coconut Chia Pudding


Ch-Ch-Ch-CHIA!.  If you were a child in the 80's, you probably remember the Chia Pet.  It was a terracotta, animal shaped, figurine that came boxed with a packet of chia seeds.  You spread the seeds onto the figurine and kept the seeds wet.  In a few weeks, they sprouted and gave your chia pet a nice coat of chia "fur." 
Chia seeds; once a sprouted ornament-now a new "health food".  After some reluctance, I decided to give the little seeds a try. 

Alone, they have a similar bite or crunch, as poppy seeds.  They do differ from other small seeds in that they hold up to 12x their weight in water.  Once wet, the Chia seeds form a gel like substance around them; much like tapioca.  Because of this, they are great to use as thickeners in puddings, shakes or smoothies. 

Coconut Chia Pudding
1 14oz can of coconut milk
1/4 cup water
5 Tablespoons of chia seeds
2-4 Tablespoons of honey or maple syrup
1 teaspoon of vanilla
1 teaspoon cinnamon

Combine all ingredients in a glass container with a lid.  Stir until well combined and honey or syrup is dissolved.  Place in fridge overnight to thicken. Add fresh fruit of your choice and enjoy.  Makes 4 servings.  


If not using local, raw honey... it's got to be CANADIAN maple syrup.

Chia seeds
I used 3 Tablespoons of maple syrup and found this to be too sweet for breakfast but this may be a personal preference.  My children loved the sweet pudding as a topping for their usual breakfast of berries, bananas, cinnamon, fish oil and yogurt. 

Chia seeds do have some health benefits.  They are high in fiber. In fact, most of the carbohydrates in the seeds are in the form of fiber.  Chia seeds are also 14% protein by weight and have no sugar.  They have many antioxidants and because of their ability to retain water, Chia seeds can contribute to a feeling of fullness, despite their minimal calories.  That said, I don't think Chia seeds are any more or less healthy than other nuts or seeds. Remember variety is the spice of life.  

Aside from making pudding, chia seeds can be used as you would any other small seed, like poppy or flax.  Chia can be used as a topping for salads, in granola, in smoothies as a "breading" and they can be sprouted and added to your sandwich or salad.  Enjoy!


Wednesday, September 9, 2015

Zucchini Muffins

We had plenty of zucchini this summer.  Unfortunately, it is not really loved at our house.  We all will eat it, but it isn't exactly requested. It is pretty much flavorless and can easily get mushy when cooked.  And, because there are very few things that irritate me more than throwing  good food away,  I had to find someway to put it to use.  MUFFINS!
  Typically zucchini muffins/bread have so much sugar and oil, the addition of zucchini does not suddenly make them good for you.  I have played with my recipe and find this one to be tasty and still pretty acceptable for the health conscious.

1 1/2 cup whole wheat flour
1 1/2 cup all purpose flour
1 teaspoon sea salt
1 teaspoon baking soda
1 teaspoon baking powder
2 teaspoon cinnamon
1/4 teaspoon ground nutmeg 
3 eggs
1/2 cup coconut oil
1/2 cup whole plain yogurt
1 cup sugar
2 teaspoon vanilla
2 1/2 cup grated zucchini
1 cup chopped walnuts

Sift flours, sea salt, baking powder, baking soda and spices into a medium mixing bowl. In a separate bowl mix eggs, oil, yogurt, sugar and vanilla until well combined.  Add dry ingredient to the wet and mix.  Add zucchini and walnuts and fold in until well incorporated.  Do not over mix.  Pour into greased muffin liners or into a  parchment lined loaf pan.  Bake at 325 for approximate 12-15 minutes if muffins or 30-40 minutes for loaf.  Allow to cool on wire rack and place in an airtight container.  This will freeze well if storing for later consumption.    
grated zucchini


 With a little grass fed butter, these made a great after school treat for the kids.  And yes, they did request more ZUCCHINI MUFFINS!


Monday, August 17, 2015

Greek Lemon Chicken with Sweet Peppers


I don't know about you, but I love one pot meals. You can prepare many of them ahead of time and pop in them in the oven to cook and be ready in time for dinner.  For me, this is such a time saver.  While dinner is cooking I can enjoy a game of checkers with my son or chase my daughter on her bike. No need stand close by to stir a pot, or have to clean up the mess of my neglect.  With all the busyness of back to school, this is a great one pot wonder. The entire meal takes less than 20 minutes to prepare and will surely satisfy the appetite, when you have that craving for Greek food at the Tarpon Sponge docks.

2-3 lbs of chicken thighs, skins removed
1 1/2 cup uncooked brown rice
2 1/2 cup vegetable stock
1/2 teaspoon sea salt
generous amount of fresh cracked peppercorns
2 teaspoons oregano
6-8 drops lemon oil ( I used NOW organic lemon oil)
2 tablespoons lemon juice
1 Tablespoon Garlic, minced
2 large sweet bell peppers, sliced
1 large Vidalia onion. thinly sliced

Tzatziki sauce 

1 cup of plain whole fat yogurt or plain Greek yogurt 
1/4 teaspoon sea salt
1/2 teaspoon lemon juice
1 teaspoon of minced garlic, or more if you please
1 teaspoon dried dill or 1 Tablespoon fresh
Mix to combine.  Adjust seasonings for personal taste.

Remove the skins from your chicken thighs. Season with salt and pepper.  Place brown rice in a deep baking dish.  Mix together vegetable stock, oregano, lemon oil, lemon juice and minced garlic.  Place chicken on top of the bed of uncooked brown rice. Pour stock mix over the entire dish.  Layer mixed layer of peppers and onions over chicken.  
This can be place in refrigerator for up to 12-18 hours before baking.  Place in 350 degree oven for 35-45 minutes or until chicken reads 180 degrees on thermometer.  Uncover and cook for 10 more minutes until liquid is mostly absorbed.  Remove from heat and allow to sit for 10 minutes.  More liquid will absorb into rice during this time.  Serve with a generous dollop of tzatziki  sauce.

Sliced green and red bell peppers and onions

Spiced chicken thighs on uncooked brown rice.

Add the vegetable stock, spice and lemon liquid.


Still lots of liquid.  Uncover and cook 10 minutes longer.

Better. Almost done.

Top with a dollop of Tzatziki sauce

Don't get me wrong, with the right combination of ingredients, at the right time, I love to tenderly watch and skillfully develop a wonderful meal for my loved ones.  I am just glad, I can prepare them a delightful meal, without having to be so attentive all the time.  I hope you enjoy!

Monday, May 4, 2015

Shepherd's Pie

Shepherd's pie.   Well it's not really a pie in the traditional sense.  Historically it began as a dish of leftover meat which was baked in a crust of potatoes.  As a kid, I always remembered my parents making it with canned cream of corn (it was the 80's) along with the traditional potato and ground beef duo. This is the one I prepare for our family.  It's an updated, healthier version of the Irish classic. 

One of the biggest differences in this Shepherd's pie is I use either sweet potatoes or butternut squash. No white potatoes in mine.  I guess if you really loved your white potatoes you could use them but I will promise you; you will not miss them once you try this version. 


Ingredients
3 Large sweet potatoes or 1 medium butter nut squash
1/4 cup plain whole milk yogurt or butter 
1 package of ground beef
2 medium yellow onions, diced
4-5 large carrots, diced
1 bag of frozen peas
2-3 cloves garlic, minced
2 sprigs of fresh rosemary, minced or about 1 teaspoon dried
sea salt and fresh black pepper to taste
coconut oil 

What is so great about this meal, is the make it and done factor.  You can make this ahead and put it in the oven when you are ready to eat.  No watching over a boiling pot, no stirring, no tending to.  This is great for those nights you want to come home and have a great, healthy meal without having to make it fresh. Truly a one dish dinner.

Typically I cook the squash or sweet potatoes ahead of time.  For the sweet potatoes I wrap them in foil and place them in the oven on a baking sheet heated to 400 degrees. Bake until they are done. (about 25 minutes or so)  Don't worry if they are in the oven a little longer.  The smooshier the better.
Baked Sweet Potatoes-Skins removed

Sweet potato skins don't go to waste at our house.
If you are using butternut squash.  Cut it in half and de-seed. Rub with a little coconut oil and sprinkle with sea salt.  Place face down on a parchment lined baking sheet in the oven heated to 400 degrees. Again, no need to fuss too much if overcooked.  

Once your tubers or squash are done, allow them to cool.  Sometimes I do this step at night and allow the squash or potatoes to cool in fridge until morning.  This makes the potatoes or squash easily slip right off the skin.  Literally, they will fall right off and into a bowl for you. Once the potatoes or squash are in a bowl, add a generous scoop of whole milk yogurt or butter.  This adds a little creaminess to the sweet "crust".


Sweet potato mixed with plain yogurt
In a saute pan, add coconut oil and heat to medium.  Once oil is melted add in diced carrots and onions.  Season with salt and pepper. Cover and cook until carrots are soft. Occasionally give them a toss to make sure they are not sticking to the pan. Once the carrots and onions are cooked, place them in a bowl and toss in fresh minced garlic and rosemary. Taste and season as needed. 
Cooked carrots, onions, garlic and rosemary


Lana likes to pick the fresh rosemary

In the same pan, brown your meat.  I usually use grass-fed beef or buffalo.  Buffalo is naturally very lean, so when I use the beef I do drain off some of the fat once fully browned.  We eat fat.  Fat is good.  But as with all things-moderation is best. 
Browned Grass fed beef

Drain off a little fat
Once the meat is browned, season to taste and layer it in the bottom of a casserole-type dish. This is the first of 4 layers in my Shepherd's pie. 
Layer 1: Beef Layer 2: Carrots and onions

Next, add your cooked and spiced carrots and onions.  

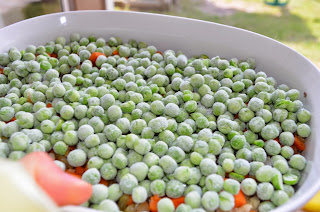
Then open your bag of frozen peas and sprinkle them over your carrots and onions in an even layer.  No need to cook the peas, they will cook in the final bake.

Layer 2: Frozen Peas

My little helper wanted a pea or two


Finally spread the sweet potato or butternut squash over your layers.  Cover and bake when you are ready to eat.  
My little helper wanted more than a pea or two.Oh no you don't!


Life is rough.


I usually  bake mine at 350 for about 25-30 minutes.  There is no need to fuss too much with the perfect bake time.  It has so much moisture in it, you could bake it for 1 hour and it will not dry out. ( Not that I have tried.  At least not on purpose.)

Jam packed with flavor and loads of nutrients.  This could be one of your new go-to recipes.  Once you have made it for the first time, you can do it with your eyes closed there-after.  Really you can. 


Thursday, April 2, 2015

Homemade Vitamins


We are blessed with two children that really eat well. Without a doubt they get at least 8 servings of fruits and veggies/day and on some days much more than that.  
Typical Meals:
Breakfast
Lunch
Dinner
Despite their good eating habits we still give them supplements.  Typically vitamins are taken to bridge the gap between what people ate and what they should be eating.  Unfortunately, due to today's farming practices, I lack confidence in the amount of nutrients in our food (organic or otherwise). So, Archer and Lana start each day with Juice Plus gummies and a quality fish oil with high amounts of DHA/EPA. We sometimes supplement with other things based on their growth or health needs at given times. And at night, they don't want to miss their dose of spicy honey. (fresh chopped garlic on a teaspoon with raw honey) 

 
 I know. kind of .... different.  But they LOVE IT! Raw honey and fresh chopped garlic have many health benefits and we love to make goodnight kisses memorable. 

For us Juice Plus is a great supplement for kids and adults alike.  17 nutritiously dense fruits and veggies all packed together in convenient, naturally sweetened gummies and/or capsules.  For the price, you really can't go wrong.  Wholesale customers can get Juice Plus capsules for around $45/month (adults) and $25/month (kids).  For us, supplements are a no-brainer.  This is our health insurance. 

For others, the value of supplements, like buying organic food over conventional is not yet understood.  Sometimes it takes a health scare to see that an ounce of prevention is worth a pound of cure.  This is okay.  Your health and your health choices are personal and when you gain enough knowledge you usually make the best choice for yourself. So, this got me to thinking, if someone won't invest in the supplements maybe they might consider making their own? This brought me to my homemade "vitamin" gummy recipes.

I decided to first start with a standard gummie loaded with antioxidants from fruits and a unique tea made from a flower.  Awhile back a practice member gave me a terrific gift.  It was a hardy collection of sorrel buds.  I had used sorrel before but only the greens in salad.  Never had I thought or even heard of using the flowers?  I had been told they are used in the islands for the purpose of making a tea type beverage.  Typically the buds are added to boiling water with ginger and left to steep.  Then sugar or honey and/or cinnamon is added.  Sometimes for a special treat rum.  For this purpose, I left out the rum.  ( Adult gummies to follow.  ha!) 
The sorrel buds are a beautiful deep red color and make a tea that is equally as vibrant.  Unflavored the tea tastes a little bitter similar to cranberry but with less pucker power.  Slightly sweetened and flavored it is deliciously refreshing! 
 Nutritionally, sorrel contains vitamin C, a variety of B vitamins and is loaded with antioxidants.  Research has shown sorrel to be beneficial for lowering elevated cholesterol and triglyceride levels which help prevent heart disease.  It is also believed that the flavonoids found in sorrel may be a useful deterrent against certain types of cancer and can help to enhance the body’s immune system.

Making Sorrel Tea
A hardy handful of sorrel buds (about 1 cup)
4-5 cups filtered water
Add buds to water and bring to a boil.  Turn off heat and allow to steep at least 1 hour.  
Vibrant Red Sorrel

Gorgeous Sorrel Buds
 
Boil the water with Sorrel buds

Strain tea.


Immuno-boosting Sorrel and Berry Gummies
3/4 cup sorrel tea ( can substitute for organic fruit juice or another variety of tea)
1/4 cup boiling water
1/4 c gelatin powder ( I use Bernard Jensen)
2 Tablespoon raw honey or maple syrup (optional and to taste)

3/4 to 1 cup pureed berries ( I used blueberry and strawberry)  


Prepare your silicon or candy molds by greasing them with coconut oil.  If you do not have mold you can simply use a greased glass baking dish.  8x8" square works best for this amount.  
1. Puree fruit.  
2. Boil water
3. Mix honey and tea.  
4.  Add gelatin to 1/2 of the tea and stir until it forms a thick paste.
5.  Quickly add boiling water. Stir until well dissolved.
6.  Add remaining tea and pureed fruit. Continue stirring.
7. Pour into molds.
8. Place in fridge until set.
9. Remove from molds and store in refrigerator for upto 2 weeks. 
 
Mix part liquid with gelatin

Add other liquid and fruit puree

Pour in molds

Slicing set gummies with sharp knife.

Remove from mold


Orange Banana & Ginger Gummies

1/2 cup boiling water
1/2 cup fresh squeezed orange juice
1/4 cup gelatin
2 tablespoons honey
3/4 cup of orange & banana puree
1/4 teaspoon fresh grated ginger


Fresh grated ginger


Orange Banana & Ginger gummies

Yep, they loved them.
Basically you can do any combination.  Just remember 1 cup of liquid to 1/4 cup of gelatin.  ( a minimum of 1/4 cup of that liquid needs to be boiling) Add 1/2-1 cup of fruit or veggie puree.  Sweetener and spices as desired.